• Home
  • FAQ’s
  • Contact
    • About Me
    • Policies
      • Privacy Policy
      • Disclaimer Policy
      • Terms & Disclosures
  • Privacy Policy
  • Terms & Disclosures
    • Facebook
    • Instagram
    • Pinterest
    • Twitter
    • YouTube

Blooming Homestead

  • Gallery
  • DIY/Crafts
  • Home Decor
  • Recipes
    • Breads
    • Desserts
    • Dips/Appetizer
    • Main Dishes
    • Soups/Sandwiches
  • printables
  • holidays
    • Valentines
    • St. Patrick’s Day
    • Easter/Spring
    • 4th of July
    • Halloween
    • Fall/Thanksgiving
    • Christmas
  • Organization
    • Home Binder Printables
    • Printable Calendars
    • Cleaning Tips & Tricks
    • Organization Tips

Halloween, DIY Brooch

in Crafts, DIY/Crafts, Fabric, flowers, Halloween, holidays, Tutorial on 06/10/10

It’s almost time for Halloween. I decided to use my leftover fabric from my Halloween banner to make a Halloween Brooch. Here are my supplies, fabric, glue gun, felt, and clasp pin to glue onto the back (not sure what those are called). I photographed some buttons as well as I planned on added them as embellishments, but after I got my rosettes done I liked them the way they were. This brooch would be super cute and versatile. I pinned in on a black cardigan for today but it would be cute on a white or colored t-shirt as well.

Rip fabric into strips. Mine were less than 1 inch wide, give or take.

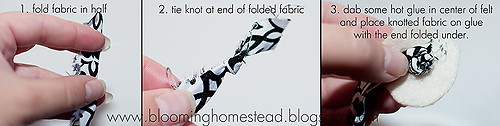
Fold fabric strip in half, tie knot at end of folded fabric, cut out circles the size of your desired rosettes out of felt backing and add a dab of glue to the center of felt to glue on folded knot. I tuck the edge of the strip under the knot when I glue it down. I think the knot creates a nice “center” to the rosette.

At this point, you will just take hold of your folded fabric strip and twist it around and tack it to the felt with small dabs of glue. Play around with it, practice if you need to to get your desired “look”.


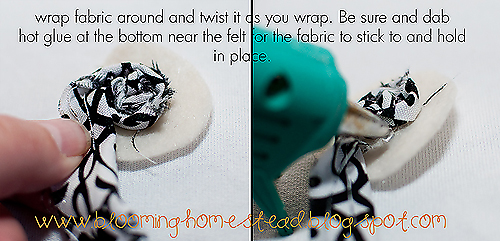
Keep wrapping fabric until you get to the edge of the felt circle and then wrap under until you can’t see any more felt.

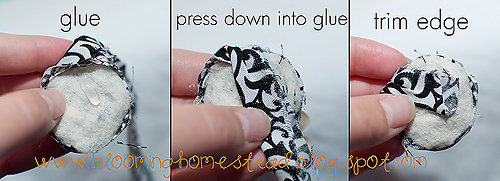
At this point I just wrap the strip under the flower and glue it down under the bottom. Trim off excess fabric.

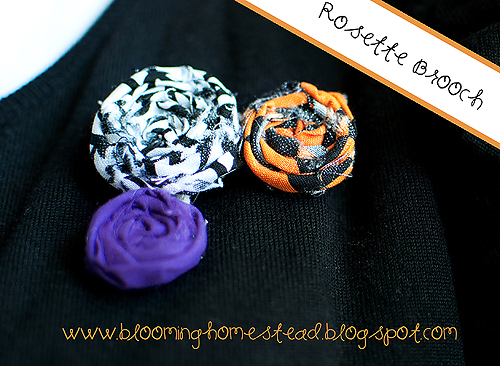
I cut out some more felt looks like mickey mouse 🙂 and glued my rosettes to the felt as backing and then to each other (be careful so the glue doesn’t smudge through, I just added a little in between to get them to be more stable). Then I glued on the ‘clasp pin’ and let it cool.


That’s it! Add it on to your favorite cardigan, headband, hat, or handbag and you’ll be showing your “festive” side in style!

Want updates and spoilers on projects and ideas?  Come like me on facebook , twitter, and Google + to keep up on whats up next!

PhotobucketPhotobucketPhotobucketPhotobucket

 
Please click over to see the rest of this post! Thanks so much!

Add a Comment

About Marie

Marie is the author of Blooming Homestead and loves to share her latest home decor ideas, crafts, recipes, home organization tips, and diy projects.

« Its that time of year…
Get It Together Series »

Leave a Reply Cancel reply

Your email address will not be published. Required fields are marked *

Welcome! I'm Marie an avid crafter with a passion for home decor and organization! I am so glad you are here!

  • Facebook
  • Instagram
  • Pinterest
  • Twitter
  • YouTube

Popular Posts

Follow me on Instagram

[instagram-feed]
Friends of Pfister You blog. You Profit. Sign up for SocialSpark!
“Blooming Homestead is a participant in the Amazon Services LLC Associates Program, an affiliate advertising program designed to provide a means for sites to earn advertising fees by advertising and linking to amazon.com."

Copyright © 2025 · glam theme by Restored 316

Copyright © 2025 · Glam Theme on Genesis Framework · WordPress · Log in

  • Home
  • Privacy Policy