• Home
  • FAQ’s
  • Contact
    • About Me
    • Policies
      • Privacy Policy
      • Disclaimer Policy
      • Terms & Disclosures
  • Privacy Policy
  • Terms & Disclosures
    • Facebook
    • Instagram
    • Pinterest
    • Twitter
    • YouTube

Blooming Homestead

  • Gallery
  • DIY/Crafts
  • Home Decor
  • Recipes
    • Breads
    • Desserts
    • Dips/Appetizer
    • Main Dishes
    • Soups/Sandwiches
  • printables
  • holidays
    • Valentines
    • St. Patrick’s Day
    • Easter/Spring
    • 4th of July
    • Halloween
    • Fall/Thanksgiving
    • Christmas
  • Organization
    • Home Binder Printables
    • Printable Calendars
    • Cleaning Tips & Tricks
    • Organization Tips

Red Heart Paper Quilling

in craft, holidays, quilling, Tutorial, Valentines on 21/01/11

I am loving how this Paper Quilling Heart project turned out. Let’s just say there have been way too many snow days lately. This week has just been crazy and I feel like I haven’t even got anything done! The other day we were stuck in the house while it was dark and rainy, so I decided to try paper quilling. I wanted to make a heart. I took some pics along the way of my first quilling project, I didn’t really know what I was doing but I still had fun and liked how it turned out. Pardon the lighting, I had no natural light so I strapped on the external flash and went to town.

First I used cardstock in a deep red color I liked. Cardstock is a little tricky because of its stiffness but it is the only red I had on hand (besides kids construction paper) I cut them into 1 inch wide strips roughly because I wanted some good dimension for my final project.

I started at one end slowly rolling the paper tightly until it was all rolled.

They ended up looking like this. When I let go of them they loosen and each take on their own little personality.

I decided to use a little hot glue and dabbed a little on the end to keep the rolled paper bound.
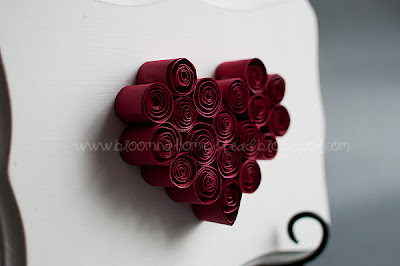
I set up all my rolled circles together and put them in a heart shape. I kept rearranging them until I got them how I liked them. Notice the very bottom one is different, I squeezed the very bottom of the circle to elongate it. After I had them how I liked them I started using a little hot glue to glue them to each other. One thing to note: Using a craft glue of e6000 would probably be less obvious, I wasn’t as careful as I should of been so if you look close you can see evidence of the hot glue. 

I thought these could be so cute on a valentine card, hanging up, as a garland, or even just sitting out. I really loved how the look turned out. Okay, moving on. 🙂

I went to the basement to find something to put my heart on. I am working on crafting with what I have and re-purposing items already in my stash. I found this little wood plaque that I had previously painted black to use for a different project that never happened.  I just got some flat white paint and painted over the black. I should have used primer, but I didn’t, so after like 3 coats we were good to go.

I did a light sanding on the edges just to add some personality, and you can see that some of the black started showing through which looked good.Then I just lightly put a few dabs of hot glue on the back side of the heart and stuck it on. Didn’t get a picture of that step but I’m sure you get the picture!

Final product. Note to self: be more careful with the hot glue next time! If I had my sillouette (I’m still dreaming of one…think of all the cool stuff I could make!) I would have possibly added a little vinyl to spice it up a bit.

I’m so Lovin’ this…it doesn’t hurt that it was free since I had everything I needed to make it work.
 
Want updates and spoilers on projects and ideas?  Come like me on facebook , twitter, and Google + to keep up on whats up next!

PhotobucketPhotobucketPhotobucketPhotobucket

Please click over to see the rest of this post! Thanks so much!

20 Comments

About Marie

Marie is the author of Blooming Homestead and loves to share her latest home decor ideas, crafts, recipes, home organization tips, and diy projects.

« Blog Schedule Printable
February Calendar Printable »

Comments

  1. WobiSobi says

    January 21, 2011 at 11:34 am

    This is beautiful, So simple and elegant. I love! nice job.

    Reply
  2. DANA says

    January 21, 2011 at 8:17 pm

    If you haven’t already, I would love for you to come link up at my linky party and have the chance to be the Best of the Best for January!

    http://www.thesaturdaymorningsblog.com/2011/01/strut-your-stuff-like-you-mean-it.html

    Reply
  3. suzieq2 says

    January 21, 2011 at 9:55 pm

    Very nice! I like your style!

    Reply
  4. J & M Bredsguard says

    January 24, 2011 at 1:46 am

    I LOVE THIS!

    Reply
  5. J & M Bredsguard says

    January 24, 2011 at 1:46 am

    I LOVE THIS!

    Reply
  6. J & M Bredsguard says

    January 24, 2011 at 1:46 am

    I LOVE THIS!

    Reply
  7. Blooming Homestead says

    January 24, 2011 at 2:21 pm

    Thanks so much! It was kind of fun and super easy.

    Reply
  8. Michelle (www.thereallifemom.blogspot.com) says

    January 24, 2011 at 3:46 pm

    This is gorgeous!

    Reply
  9. sweet & lovely crafts says

    January 24, 2011 at 6:39 pm

    That looks great!

    Reply
  10. sweet & lovely crafts says

    January 24, 2011 at 6:39 pm

    That looks great!

    Reply
  11. sweet & lovely crafts says

    January 24, 2011 at 6:39 pm

    That looks great!

    Reply
  12. Kileen says

    January 25, 2011 at 8:17 pm

    Beautiful and simple. Love it!

    Reply
  13. lauren@WESTFURNITUREREVIVAL says

    January 26, 2011 at 9:35 pm

    very cute. love the heart.

    Reply
  14. Kathy says

    January 26, 2011 at 11:03 pm

    The heart’s just gorgeous….well done!

    Here’s my entry…

    http://myartycraft.wordpress.com/2011/01/20/easy-wall-art/

    Kathy

    Reply
  15. Danielle says

    January 27, 2011 at 1:46 am

    I love this – Im your newest follower. Stop by if you have a chance.

    Reply
  16. Lisa says

    January 28, 2011 at 12:25 am

    What a great idea! I love it!

    Reply
  17. DANA says

    January 29, 2011 at 5:24 am

    You have made the finals! Check it out!

    http://www.thesaturdaymorningsblog.com/2011/01/finalists-for-week-four.html

    Reply
  18. Simply AJ says

    January 30, 2011 at 2:38 pm

    Voted for you! I love the idea and I am going to try and make one. Thanks for the inspiration. AJ
    queenofmynest(at)gmail(dot)com
    https://queenofmynest(dot)blogspot(dot)com

    Reply
  19. The Loops says

    February 1, 2011 at 9:28 pm

    I love this. I am scared to be up against in in the Best of January. I was coming here to ask u where you got that plaque. I had a feeling it was repurpoused so I would never be able to replicate this! Some girls find all the cool stuff…

    Reply

Trackbacks

  1. 12 Inexpensive Valentine’s Day Projects says:
    February 9, 2016 at 2:33 pm

    […] years now. You use strips of paper, tightly rolled, to create three-dimensional paper crafts. Blooming Homestead used this technique to create a paper heart that went on a wall decoration, but you could adapt it […]

    Reply

Leave a Reply Cancel reply

Your email address will not be published. Required fields are marked *

Welcome! I'm Marie an avid crafter with a passion for home decor and organization! I am so glad you are here!

  • Facebook
  • Instagram
  • Pinterest
  • Twitter
  • YouTube

Popular Posts

Follow me on Instagram

[instagram-feed]
Friends of Pfister You blog. You Profit. Sign up for SocialSpark!
“Blooming Homestead is a participant in the Amazon Services LLC Associates Program, an affiliate advertising program designed to provide a means for sites to earn advertising fees by advertising and linking to amazon.com."

Copyright © 2025 · glam theme by Restored 316

Copyright © 2025 · Glam Theme on Genesis Framework · WordPress · Log in

  • Home
  • Privacy Policy